Manage Parts
About Parts, Part Assemblies, Part Instances
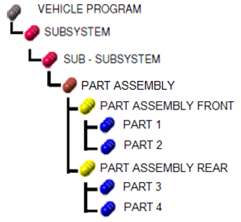
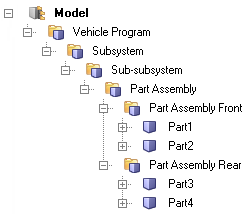
A part is an engineering representation of a physical part, and a part assembly is a group of part assemblies and/or parts. Part Instances, which are recognized from PDM, are automatically converted to Part Instances on import into HyperMesh.
Parts and Part Assemblies
HyperMesh supports CAE parts ( ![]() ) and
part assemblies (
) and
part assemblies ( ![]() ) and
PDM parts (
) and
PDM parts (![]() ) and
part assemblies (
) and
part assemblies ( ![]() ).
).
 |
 |
If a part is comprised of multiple components, such as cast parts or tailor-welded blanks, you can perform actions such as visualization view modes, model management, and connector link definition at the part level.
Parts can be used to organize a physical part that is made up of multiple components in a CAE model as a single part.

In the Part Browser, collapsing all folders at the part level enables you to see all owned and referenced entities. Expanding folders at the part level displays a nested list of all referenced components and their entity specific attribute values which are shown in the respective columns.
Part Instances
The Part browser provides limited support for part instances of externally sourced BOMs.
Part Instances (![]() )
share UID and Part names. The name assigned to child instances is incremented by
*.ixx, where xx indicates the number
of the child instance. The positioning of Part Instances is dictated by the
transformation matrix applied to the Part in the PDM system. Part Instances can also
be created and broken interactively in a session. Upon creation, you will
automatically be prompted to transform the part via the Transform tool. When broken,
instances are split into two separate parts that are independent of each other.
)
share UID and Part names. The name assigned to child instances is incremented by
*.ixx, where xx indicates the number
of the child instance. The positioning of Part Instances is dictated by the
transformation matrix applied to the Part in the PDM system. Part Instances can also
be created and broken interactively in a session. Upon creation, you will
automatically be prompted to transform the part via the Transform tool. When broken,
instances are split into two separate parts that are independent of each other.
In circular, symmetric, or rectangular patterns, certain parts may appear in a BOM multiple times. Typical examples include bolts, hinges, and symmetric parts.
Creating or saving part representations for instantiated parts saves a single representation in the repository. Importing instantiated parts positions them according to their respective 4 x 3 transformation matrices.
Create Parts, Part Assemblies, and Part Instances
Only CAE parts and part assemblies can be manually created in HyperMesh. PDM parts and part assemblies must be imported imported into HyperMesh.
Parts and Part Assemblies
Part Instances
Import Parts, Part Assemblies, and Part Instances
Import PDM Data
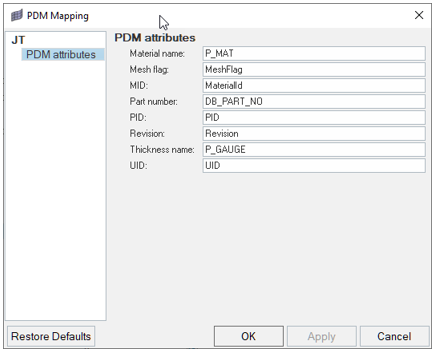
Import metadata from CAD to part. This facilitates visualizing CAD-centric metadata in the Part Browser and aids in the model build workflow.
Organize Part Assemblies and Parts
Organize part assemblies, parts, and components in your model.
- The Model is the root of the hierarchy in the browser. It represents the contents of the HyperMesh binary file and can contain part assemblies, parts, and components.
- A part assembly can contain part assemblies and parts.
- A part can only contain components.
Save Assemblies as HyperMesh Binary Files
The part assembly can be saved as a self-contained binary file, which will include the part assembly based hierarchy and attributes such as components, properties, and materials.
You can perform all necessary tasks such as geometry updates and meshing in the distributed HyperMesh binary file. The completed file can then be imported into the master HyperMesh session by importing a model.
You can also update by saving representations from a standalone part assembly to the library, and loading updated representations in the second session.
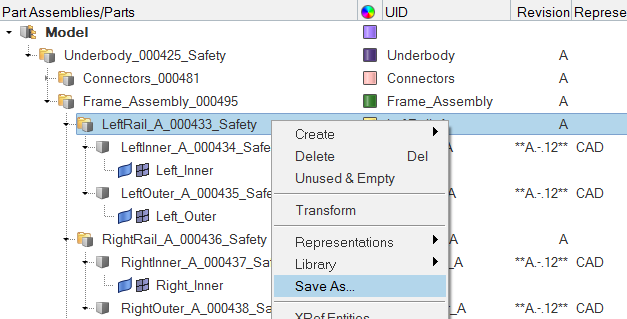
- In the Part Browser, right-click on a part assembly and select Save As from the context menu.
- In the Save As dialog, save the binary in the representations directory for the current binary file.

Manage Representations
About Representations
The CAD representation is typically the original source of information of what a physical part will look like. It forms the basis of the Common representation, which in turn is the basis of all subsequent discipline specific mesh representations. A part can contain multiple representations.
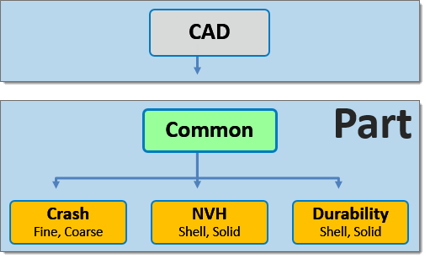
A folder based Representation repository stores all CAE data that is required during the model build and assembly process. CAE data stored in the Representation repository includes the geometric and FE representation of the parts that comprise the subsystem specific model hierarchy.
You can import a BOM via a neutral file format such as PLMXML or manually create a part structure using the Part Browser context menu.
Common Representation
The Common representation is derived from the CAD representation and forms the basis of all subsequent discipline specific mesh representations.
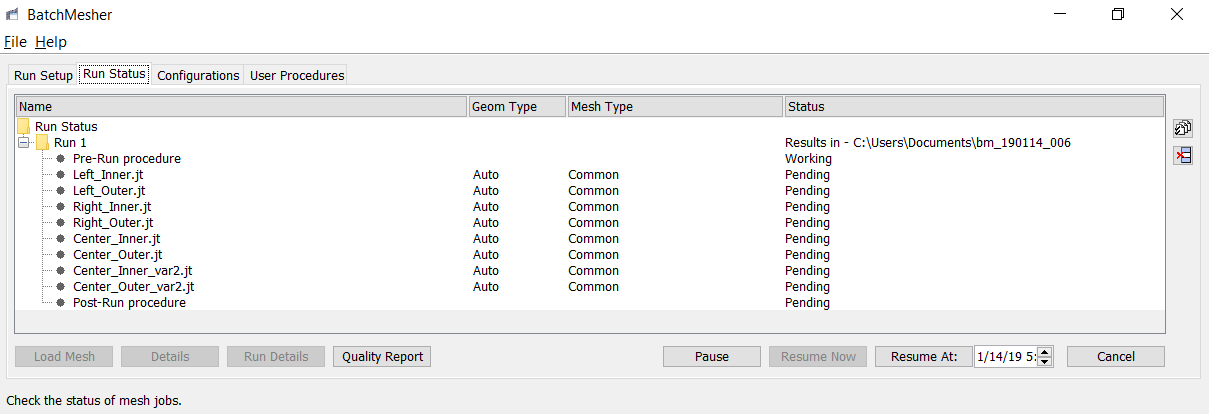
For sheet metal parts, the Common representation consists of midsurfaced geometry or FE. The CAD is sent to the BatchMesher for midsurface extraction; upon completion it is saved into the repository and you can elect to immediately import the representation into the session.
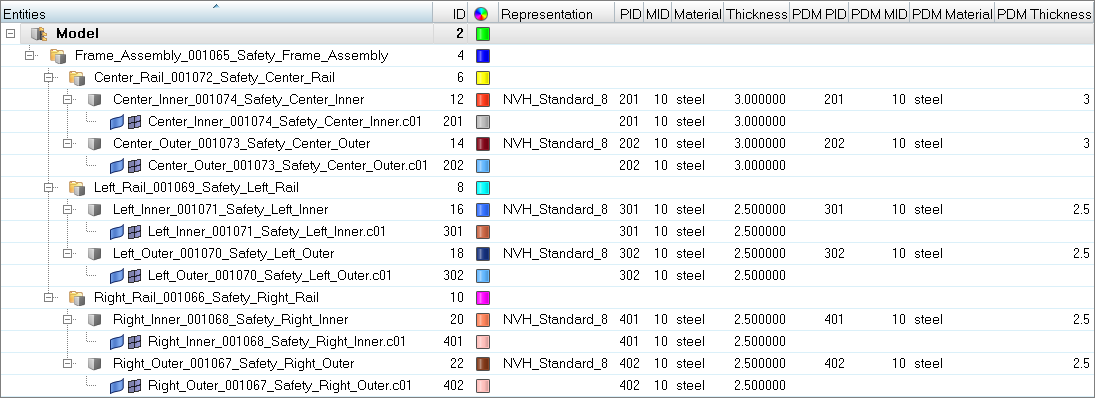
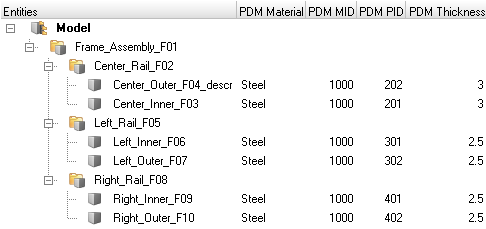
HyperMesh entities are generated from the PDM metadata, if available, in the post-run procedure of the BatchMesh operation. The PDM PID is assigned to the component and property, the PDM MID and PDM material is assigned to the material and the PDM Thickness is assigned to the Thickness attribute of the property. If the PDM Thickness is blank, the CAD Thickness calculated during the midsurface operation is automatically assigned to the Thickness attribute of the property.
For parts such as castings and tailor-welded blanks, you can save CAD representations as Common models.
Alternatively, you can send solid parts to the BatchMesher. If thin-solid detection is enabled in the Common representation parameter file, then solids will be detected and saved as the Common representation without processing. By default, the midsurface algorithm skin is used. CAD representation does not need to be loaded into the session in order to generate the Common representation since it is sent directly to the BatchMesher for processing.
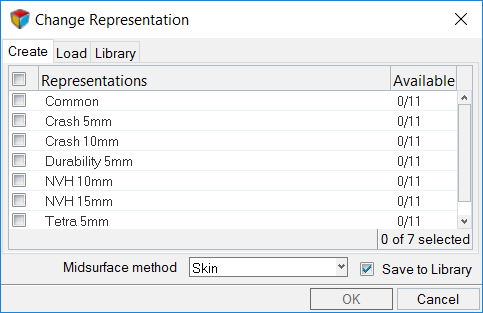
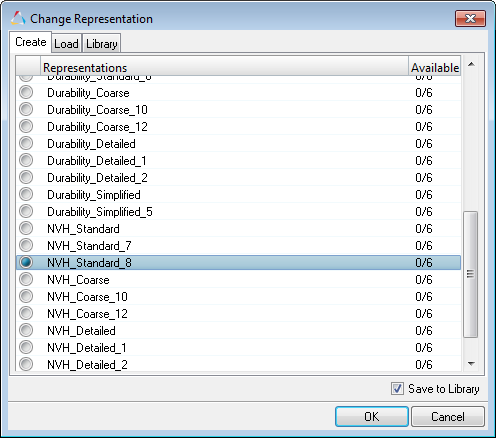
When you select a discipline specific mesh representation from the Change Representation dialog, Create tab, the Common representation residing in the repository is automatically sent to the BatchMesher for processing. If the Common representation does not exist it will be automatically generated.
Discipline Specific Mesh Representations
Create Representations
Representations utilize the mesh parameter and criteria files that are included with HyperMesh. You can find these files in the BatchMesher. The Param File and Criteria File fields display the representation specific mesh parameter and criteria file.
Common representations form the basis of all subsequent discipline specific mesh representations. When you select a discipline specific mesh representation from the Change Representation dialog, Create tab, the Common representation residing in the repository is automatically sent to the BatchMesher for processing. If the Common representation does not exist it will be automatically generated.
Define Representations
Create your own user defined representation. User defined representations are saved to the settings and will be available in subsequent HyperMesh sessions.
- In the Part Browser, right-click on part assemblies or parts and select from the context menu.
- In the User Representation dialog, click + to add a new representation.
- In the Representation field, enter a name for the representation.
- In the Param File and Criteria File fields, select the appropriate mesh parameter and criteria file.
- If the representation is for solids, select the Solid checkbox.
- Click OK.
Add Representations
Part representations can be added from external sources such as solver decks and HyperMesh binary files or from the Part Library.
Add Representations from External Sources
Add representations from external sources for a single part or for multiple parts and part assemblies.
When selecting a part assembly or multiple parts, the Add Representations dialog enables you to map and associate representation files to multiple parts simultaneously.
If appropriate metadata is available in the BOM, then the alias values will be preselected. After choosing a Representation Folder, representation files will be mapped according to the HyperMesh naming convention. You can then manually select or update any of the alias and representation file values.
- Skip.
- Any Part which does not have a mapped or selected representation.
- OK.
- Alias and representation are chosen for the part.
- Overwrite.
- Part already has a representation which will be overwritten by the selected mapping.
- Duplicated.
- The same representation file is chosen for more than one part, or the chosen representation file is already used by another part in the same BOM. You cannot click OK to add the representations when representations are duplicated.
- In the Part Browser, right-click on the part assemblies or part(s) and select the context menu.
-
In the Add Representation(s) dialog, define options
accordingly.
To add representations for Do this Single part - From the Representation field, specify a desired representation
type to which a representation file will be added.
- Choose a default representation type.
- Enter your own user defined representation into the field.
- If you entered your own representation, select the appropriate mesh parameter and criteria files.
User defined representations with defined mesh parameter and criteria files created in the Add Representation dialog will be available in the Change Representation dialog, Create tab. User defined representations with undefined mesh parameter and criteria files created in the Add Representation dialog will not be available in the Change Representation dialog, Create tab, but will appear in the Load tab if a representation is found in the repository.
The availability of the selected representation in the repository is displayed next to the representation type within parentheses.
Figure 12.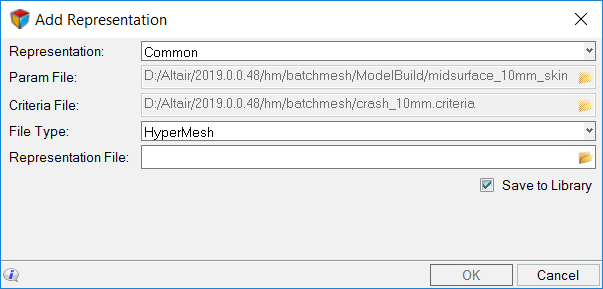
Multiple part or part assemblies - In the Representation Folder field, navigate to the representation file.
- For each part, select the representation type to be added. Use
the Representation File drop-down menu for each part to map.
Parts associate with the representation file. This will be done
automatically if there is a matching file. Note:
- You cannot add CAD or connectors.
- You can select Part or Part Assembly for adding the representation.
Figure 13.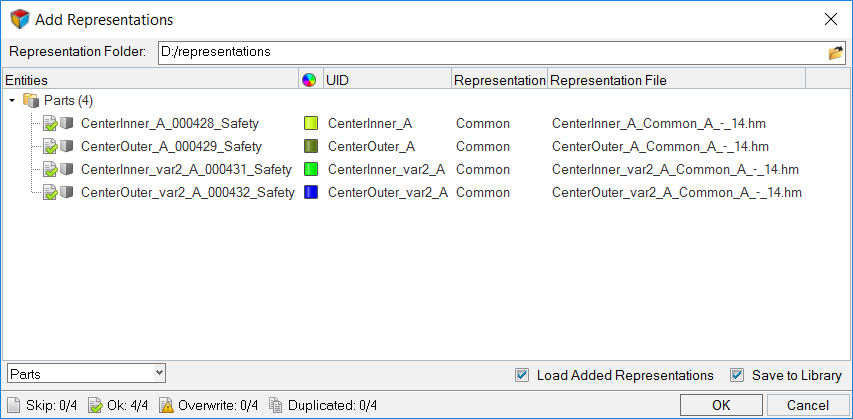
- From the Representation field, specify a desired representation
type to which a representation file will be added.
- To save the representations to the Part Library select the Save to Library checkbox.
- Click OK.
Add Representations from the Part Library
Add Representations to the Part Library
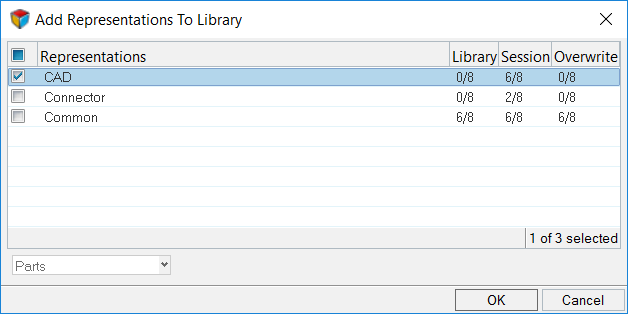
After importing a BOM, you can add CAD representations to the Part Library.
- In the Part Browser, right-click on a part/part assembly and select from the context menu.
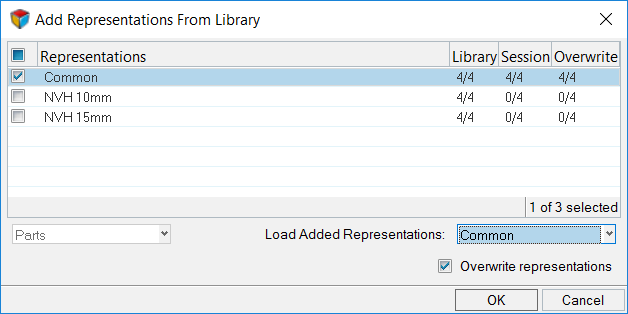
- In the Add Representation to Library dialog, select representations and click OK.
The Add Representation to Library dialog displays information regarding the availability of representations in library, session, and overwrite details.
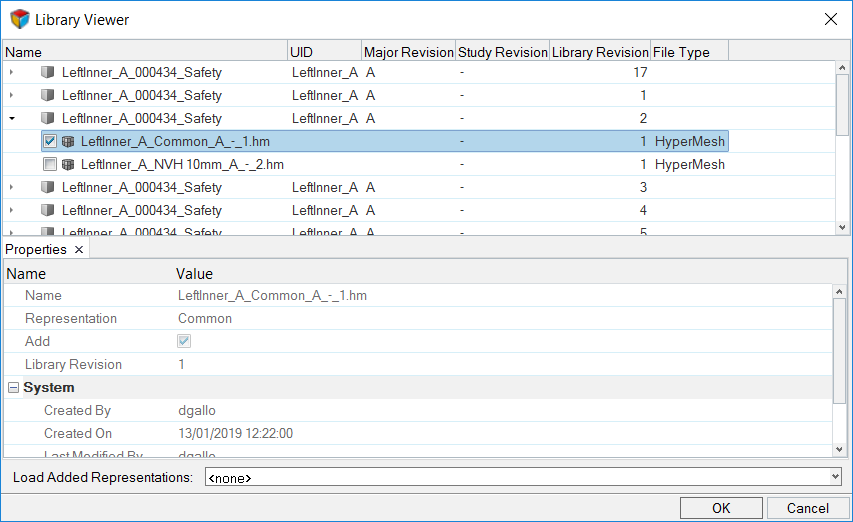
Browse Library Content
Review library content using the Library Viewer.
Load Representations
Part representations can be loaded from your current HyperMesh session or from the Part Library.
Load Representations from Current HyperMesh Session
Load Representations from the Part Library
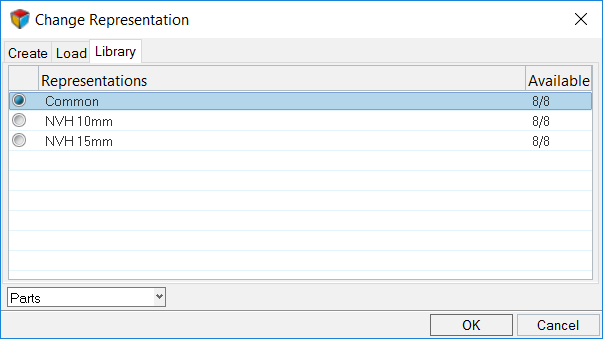
After importing a BOM that has representations saved in the Part library, you can load the saved representations.
- In the Part Browser, right-click on a part/part assembly and select from the context menu.
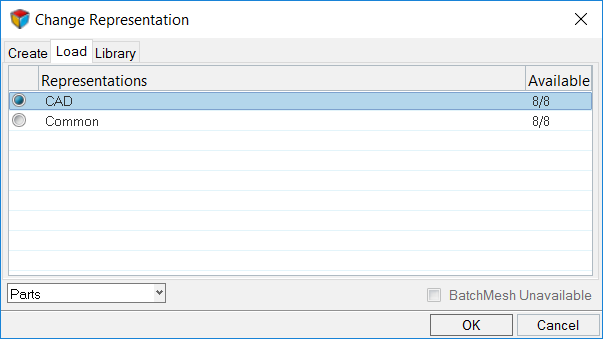
- In the Change Representation dialog, Library tab, select representations and click OK.
Reload Representations
Restore part representations to their original state.
Unload Representations
Unload part representations from a session.
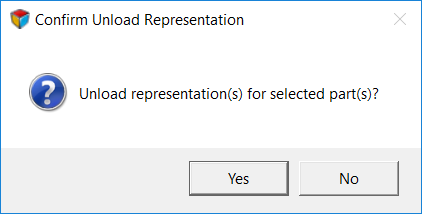
- In the Part Browser, right-click on the model, part assemblies, or parts and select from the context menu.
- In the Confirm Unload Representation dialog, click Yes to unload the selected representations.
Update Metadata From PDM
Sync Metadata To PDM
Sync PDM metadata (PDM PID, PDM Thickness, PDM Material, and PDM MID) based on a selected part or part's metadata (PID, Thickness, Material, MID).
Save Representations
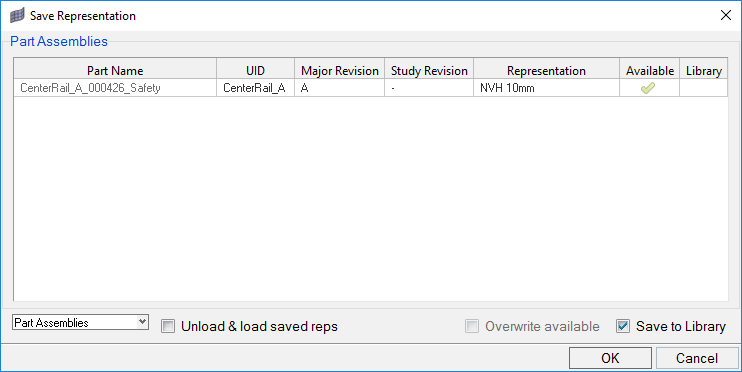
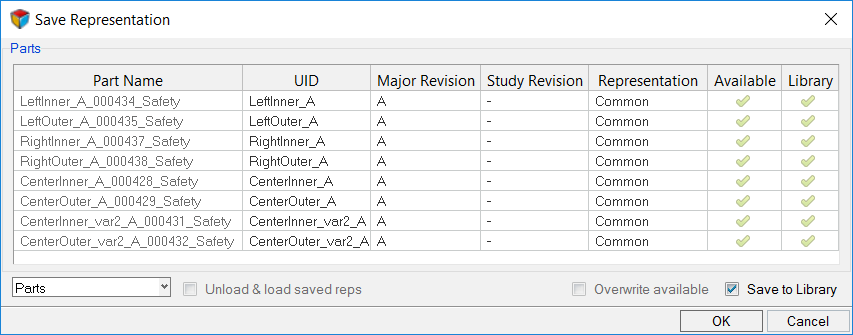
After importing a BOM and creating respective representations, you can save the representations locally or in the Part Library.
Saving Parts
Parts and part assemblies without a UID cannot be saved to the Library. Considering this, the UID field in the Save Representation dialog is user editable.
Saving Part Assemblies
Part Assemblies can also be saved to the Library. This saves all parts as one Part Assembly representation rather than individual Part representations. This enables mesh connectivity between parts to be retained upon unloading and loading of the Part Assembly.
Delete Representations
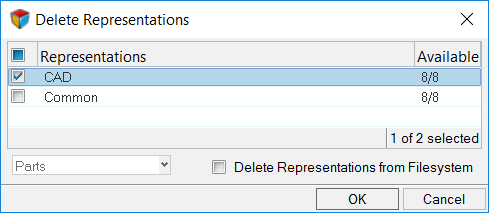
Part representations can be deleted from the current HyperMesh session and from the Part Library.
Delete Representations from the Current HyperMesh Session
Delete Representations from the Part Library
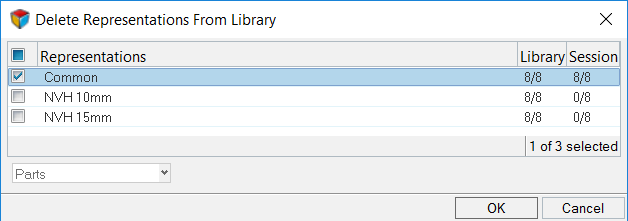
- In the Part Browser, right-click on part assemblies or parts and select from the context menu.
- In the Delete Representations From Library dialog, select representations to be deleted.
- Click OK.
Representation Load Settings
Settings to configure the representation entity management behavior.
Open the Representation Load Settings dialog by right-clicking in the Part Browser and selecting .
The representation entity management settings work independent of the import binary and import deck entity management settings.
- Offset ID.
- Merges incoming attributes with conflicting IDs into the session, and offsets their IDs.
- Keep Existing Attributes.
- Maintains existing in-session entity attributes and incoming conflicting entity IDs.
- Keep Incoming Attributes (default).
- Maps incoming entity attributes to the in-session entities.
When Offset ID is selected for components, both incoming and existing geometry and FE residing in the component with conflicting IDs are kept. When Keeping Existing Attributes or Keep Incoming Attributes are selected for components, incoming geometry and FE that resides in the component with conflicting IDs are kept.
Manage Part Revisions
Manage, control and update Major, Study and Library Part revisions using the Part Library.
About Part Library and Revisions
The Part Library is an integral part of data management and revision control within the Part Browser.
Part Library
- Unmanaged
- Local file management
- Managed
- Uses the Part Library
The Part Library serves as a centralized library of HyperMesh parts, which in turn facilitates the collaboration between simulation teams both locally and abroad.
You must be connected to a Part Library to access all Part Library related options.
Parts without a UID cannot be saved to the Library. Considering this, the UID field in the Save Representation dialog is user editable.
Revisions
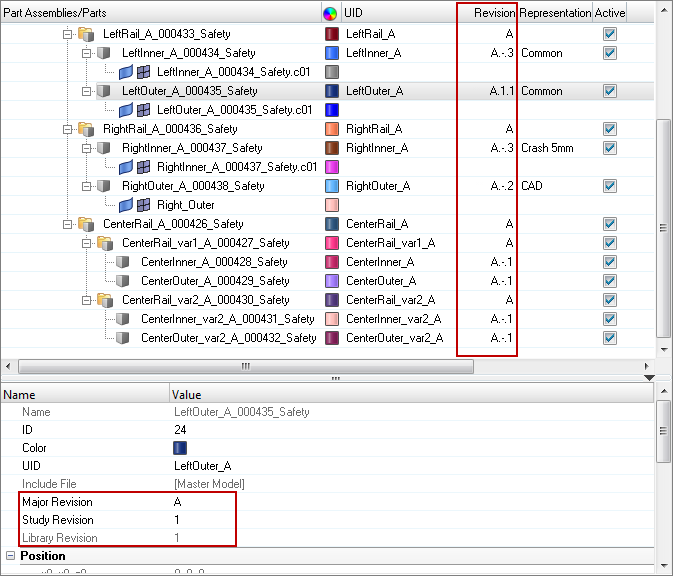
- Major Revision
- Depicts a change or set of changes that have been finalized and released for further review. In most cases the Major Revision is mapped to the PDM Revision, but you can modify it.
- Study Revision
- Created locally to track experimental changes or prototyping changes that may or may not be published. The purpose of the Study Revision is to manage design and prototype exploratory concepts. You can modify the Study Revision.
- Library Part Revision
- Locally, published revision within the Part Library. You cannot modify the Library Part Revision. The library revision is incremented each time you save a part representation.
Register and Connect Libraries
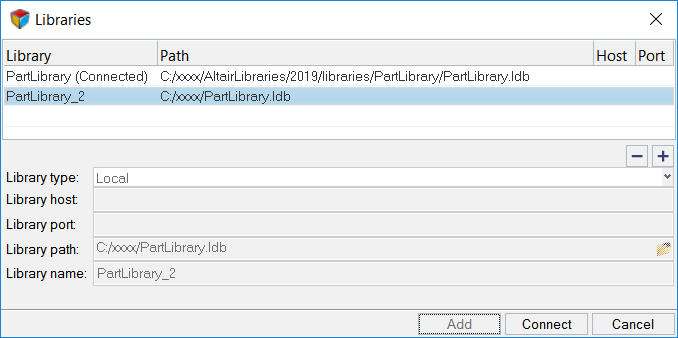
Register and connect to new libraries of your choice.
A default Part Library is generated when the Part Browser is enabled, and is located at <user home>\AltairLibraries\2020.1.
Sync Library Revisions
Sync the in-session version with the latest, available version in the Part Library.
If the version available in the current session is out of sync with the Library reversion, use Sync to update the session version with the Part Library version.
Before you can sync library revisions, you must Register and Connect Libraries.Edit Study Revisions
Study Revisions are a way to explore design space, and can be promoted to a Major Revision as required.
Assign and edit Study Revisions in the Entity Editor.
- In the Part Browser, select a part/part assembly.
- In the Entity Editor, edit the Study Revisions field.
Manage Configurations
Group common and unique parts/part assemblies together in part sets, and organize parts and part sets that are unique to a configuration.
In the traditional model build and assembly workflow, subsystems that contain multiple variants are stored in multiple HyperMesh binary files. This complicates the model build and update process as part updates and revisions will need to be performed on each binary file.
- Left-hand drive (LHD)
- Right-hand drive (RHD)
- Fixed roof (Fixed)
- Panoramic roof (Pano)
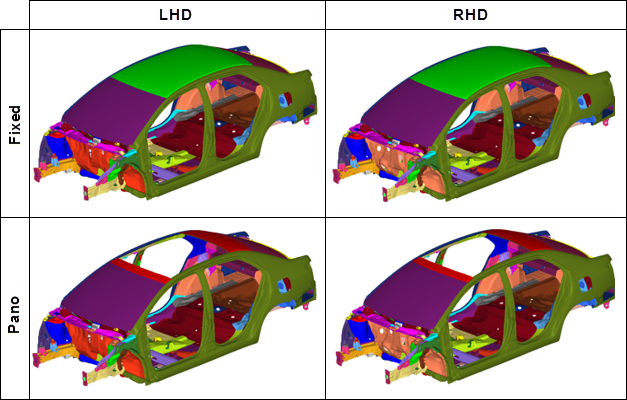
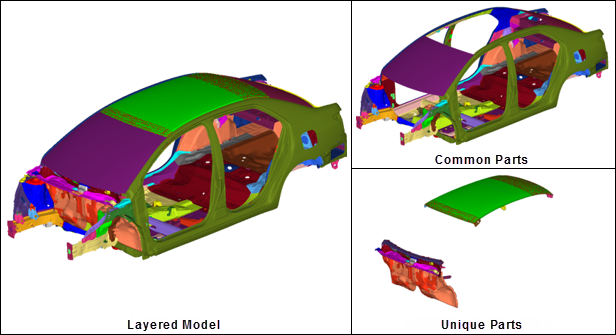
All common and unique parts that appear in all configurations for a given subsystem are stored in a single HyperMesh binary file, known as a Layered Model. In a Layered Model, common parts are active in all configurations. Unique parts are active only in a specific configuration. You must deactivate unique parts not appearing in a configuration.
About Part Sets and Configurations
Part sets group common or unique parts, and configurations organize parts and part sets that are mutually exclusive to a configuration.
Example: Configuration Management Workflow
Configuration management workflow for a Dash and Cowl subsystem.
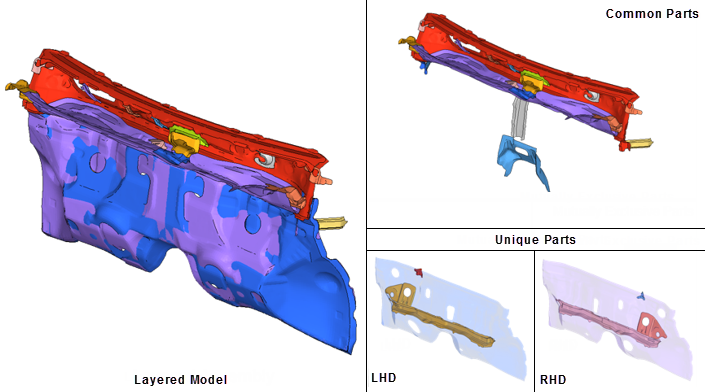
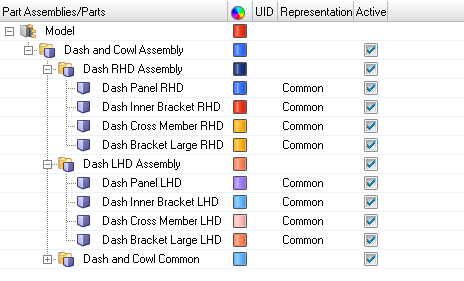
- Clear the Active column for the following individual, unique parts that
belong to the RHD configuration.
- Dash Panel RHD
- Dash Bracket Large RHD
- Dash Inner Bracket RHD
- Dash Cross Member RHD
- If all unique parts are nested in a single part assembly, clear the Active column for Dash RHD Assembly.
- If all parts and part sets that are unique are organized in a configuration, enable the LHD configuration’s associated checkbox in the Active column of the Configuration view.
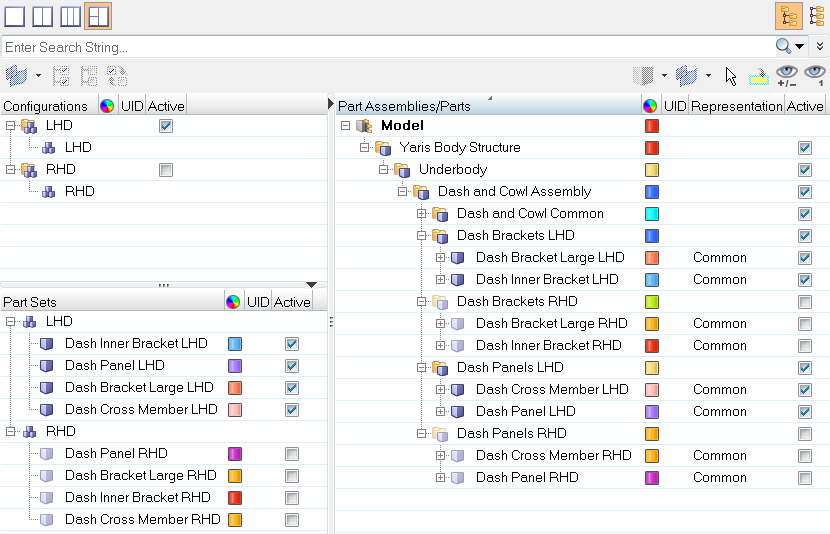
Create Part Sets
Create Configurations
- Open the Part Browser.
- In the Configuration view, right-click and select from the context menu.
- From the Part and/or Part Set views, click-and-drag parts, part assemblies, and part sets that are unique to a configuration onto the configuration.
Remove Contents of Part Sets and Configurations
- Right-click on the entity and select Remove from the context menu.
- Drag the entity into the white space of the respective browser view.
Activate/Deactivate Configurations
Control the display and export state of parts and part assemblies by changing the active/inactive state of configurations.
Entities set to inactive are still visible in the Part Browser. Deactivated components will not be visible in the Model Browser, Display panel, and panel entity collectors.
Create and Organize Part Sets from PDM Variants
- In the Part Browser, Part Set view, right-click on a part set entity (if available) or in the white space and select Create Variants from the context menu.
- In the Confirm Create Variants dialog, click Yes.
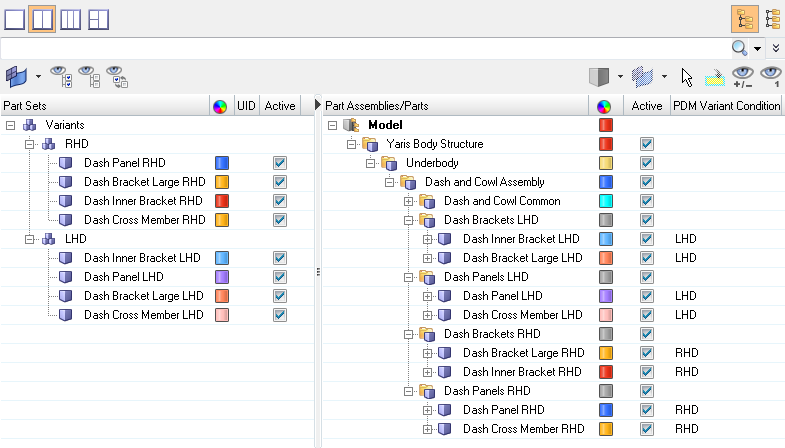
PDM Variant Conditions
PDM Variant Conditions are utilized in PDM systems, such as Teamcenter, to mark similar parts in BOMs that may contain multiple variants, such as an automotive BIW.
- PDM Variant Condition
- If non-empty, the part is used as a variant in one or more part configurations.
- PDM Variant Scope
- Along with the Variant Condition attribute, it describes which part configurations the part belongs to as a variant.
Part sets are created per PDM Variant Condition attribute found in the global part assembly/part hierarchy. The operation can be invoked at model, part assembly, or part level.
You can organize part sets from PDM Variants in any view of the Part Browser.
Teamcenter - HyperMesh Integration
All BOM-related information, including part/assembly hierarchy, part attributes, and representation information is organized and displayed in the Part Browser.
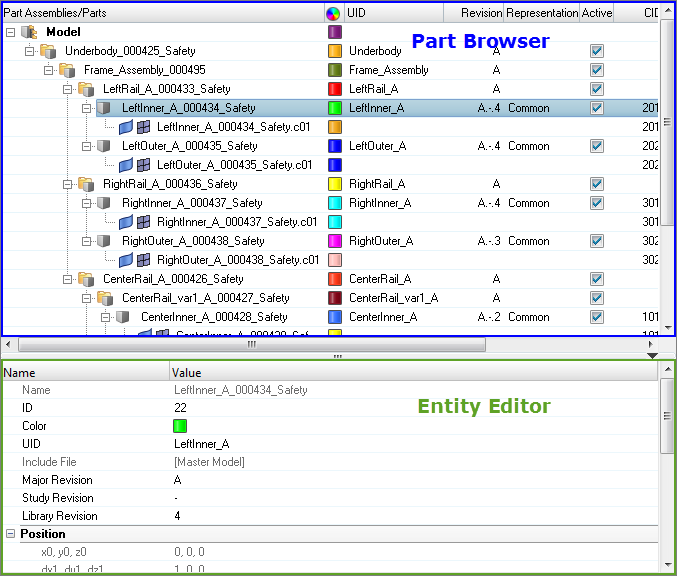
Representation (HyperMesh session) attributes are now displayed independent of the PDM attributes. Attribute columns can be turned on/off in the Column Visibility dialog, which can be accessed by right-clicking in the Part Browser and selecting Column Visibility from the context menu.
InFigure 32, the session attributes (PID, MID, Material, Thickness) are blank because representations have yet to be created or loaded. The corresponding PDM attributes, from the imported PLMXML BOM file, show their values from Teamcenter.
Representation Options
| Option | Description |
|---|---|
| Create | Creates HyperMesh representation(s) via BatchMesher. |
| Save | Saves representations for selected part(s) based on the chosen alias and file type. |
| Add | Adds representations for selected part(s) based on the chosen alias and file
type or from the Part Library. When adding representations for multiple parts or
part assemblies from external sources, the Add
Representations dialog enables you to map and associate
representation files to multiple parts simultaneously.
 If appropriate metadata is available in the BOM, then the alias values will be preselected. After choosing a Representation Folder, representation files will be mapped according to the Teamcenter naming convention. You can then manually select or update any of the alias and representation file values. Indicators are displayed for each part to
indicate the status of that row.
You cannot click OK to add the representations when representations are duplicated. |
| Load | Load part representations from your current Teamcenter-HyperMesh session or from the Part Library. If any of the selected parts currently have a representation loaded in the session, you will be prompted whether or not to unload them before loading new representations. If representations are not unloaded first, incoming representations will be imported on top of the existing representations, and Load Settings will be used. |
| Unload | Unloads representations for selected part(s). |
| Delete | Deletes representations for selected part(s) from your current Teamcenter-HyperMesh session or from the Part Library. |
| Reload | Restores part representations to their original state. |
| Settings | Displays the current load settings, which are used when representations are imported. |
Setup the Teamcenter - HyperMesh Environment
The Teamcenter integration environment requires an additional layer, on top of the out-of-the-box Part Browser behavior.
When launching HyperMesh via Teamcenter, the environment will be set automatically. However, all of the integration features may be accessed by manually setting the environment.
To manually set the Teamcenter-HyperMesh environment:
Update Teamcenter
Update Teamcenter via Teamcenter-HyperMesh Integration
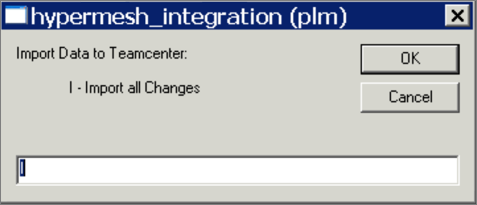
If HyperMesh was launched via the Teamcenter - HyperMesh Integration, you will be prompted to import updated data back to Teamcenter.
Update Teamcenter via Manual PLMXML Import in Teamcenter
If the BOM was loaded manually, for example HyperMesh was not launched via the Teamcenter-HyperMesh Integration, then the updated PLMXML package can be manually imported into Teamcenter.
Import BOMs
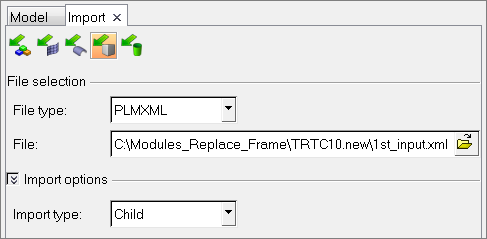
Import BOMs in HyperMesh via Teamcenter - HyperMesh Integration

Import BOMs in HyperMesh via the HyperMesh Import - BOM Tab
The BOM is displayed in the Part Browser.
Import BOMs in HyperMesh via Teamcenter - HyperMesh Integration

Import BOMs in HyperMesh via the HyperMesh Import - BOM Tab
The BOM is displayed in the Part Browser.
Export BOMs
Load CAD Representations
Load part representations from your current Teamcenter-HyperMesh or from the Part Library.
When CAD representations are loaded, components are created for the loaded CAD representations. Materials and properties, if available in the CAD file would also be created, and their values would be displayed in the Part Browser columns. Component naming conventions are not yet imposed, nor are the materials and properties created automatically at this time, therefore you can review information within the CAD files themselves prior to mesh representation creation. According to the Teamcenter-HyperMesh naming conventions, component naming and material and property handling will occur during the meshing process.
Load Representations from Current HyperMesh Session
Load Representations from the Part Library
After importing a BOM that has representations saved in the Part library, you can load the saved representations.
- In the Part Browser, right-click on a part/part assembly and select from the context menu.
- In the Change Representation dialog, Library tab, select representations and click OK.

Create Mesh Representations
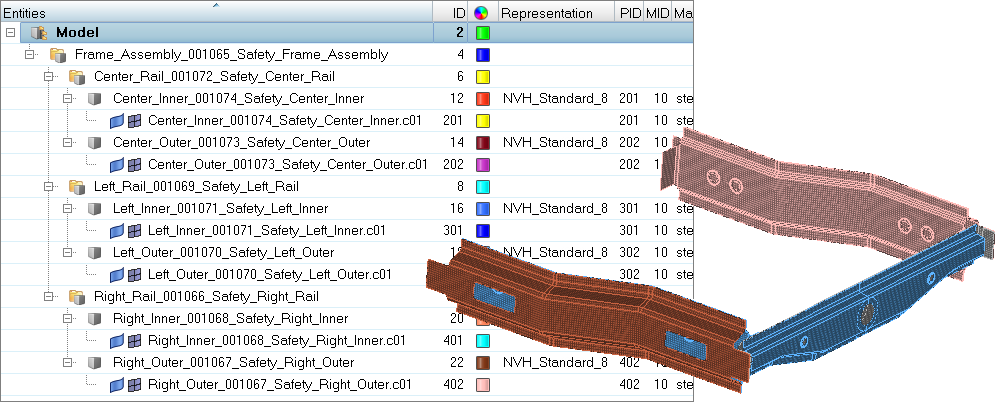
BatchMesher is invoked, and meshes are created using the appropriate batch meshing parameter and criteria files.
The parameter and criteria file mappings are configurable based on the batchmesher_config.cfg file available in the installation.
Update Metadata from PDM
Sync Metadata to PDM
Sync PDM metadata (PDM PID, PDM Thickness, PDM Material, and PDM MID) based on a selected part or part's metadata (PID, Thickness, Material, MID).
*When a part has multiple properties, only the first property will display in the PID PDM field when you select Sync Metadata.
Save and Open HyperMesh Models
You can save the HyperMesh file at any time. The HyperMesh session stores all of the BOM-related information, including hierarchy, metadata, and representations. The original PLMXML BOM file is no longer required to load, view, or modify any of this information.
Save the Current HyperMesh Models
- From the menu bar, click .
- In the Save Model As dialog, save the model to your working directory.
Open HyperMesh Models
- From the menu bar, click .
- In the Open Model dialog, open the recently saved HyperMesh model.
