Compose Notebook
The Compose Notebook is a web-based implementation of Compose’s OpenMatrix Language (OML) into a Jupyter Notebook. Notebooks (see www.jupyter.org) are a powerful way to execute and demonstrate scripted languages.
Features
- Starts as web page in your Internet browser.
- Runs OML from the current Compose installation.
- Requires a valid Compose license.
- Supports most of the OML language commands.
- Supports the rich editing capabilities (such as Markdown cells) offered by Jupyter Notebook.
- Supports access to OML help commands (very much like the Compose OML Console mode).
- Support for many OML plot commands, using the popular Plotly plotting toolkit.
- Save notebooks as regular .ipynb files.
- Supported on Windows and Linux platforms.
- The Jupyter Notebook infrastructure, based on Python.
- A customized Jupyter front page.
- An OML kernel for Jupyter.
- The full OML interpreter and OML libraries, including license management.
Start the Compose Notebook
Windows
Linux
Licensing
Compose Notebook relies on the same licensing mechanism as Compose. Please use Compose (GUI mode) to define and select your preferred licensing mode. The settings defined in Compose will be used in the Compose Notebook.
Closing the Notebook
- Closing the OML session using
- Closes the OML session and checks in the license. The Notebook console is still active; you must close the console to exit the notebook completely.
- Closing the tab in your browser
- Does not end the OML session; the license is still in use. The advantage to this method is re-opening the same .ipynb file connects you to the previous OML session. The Notebook console is still active; you must close the console to exit the notebook completely.
Menus
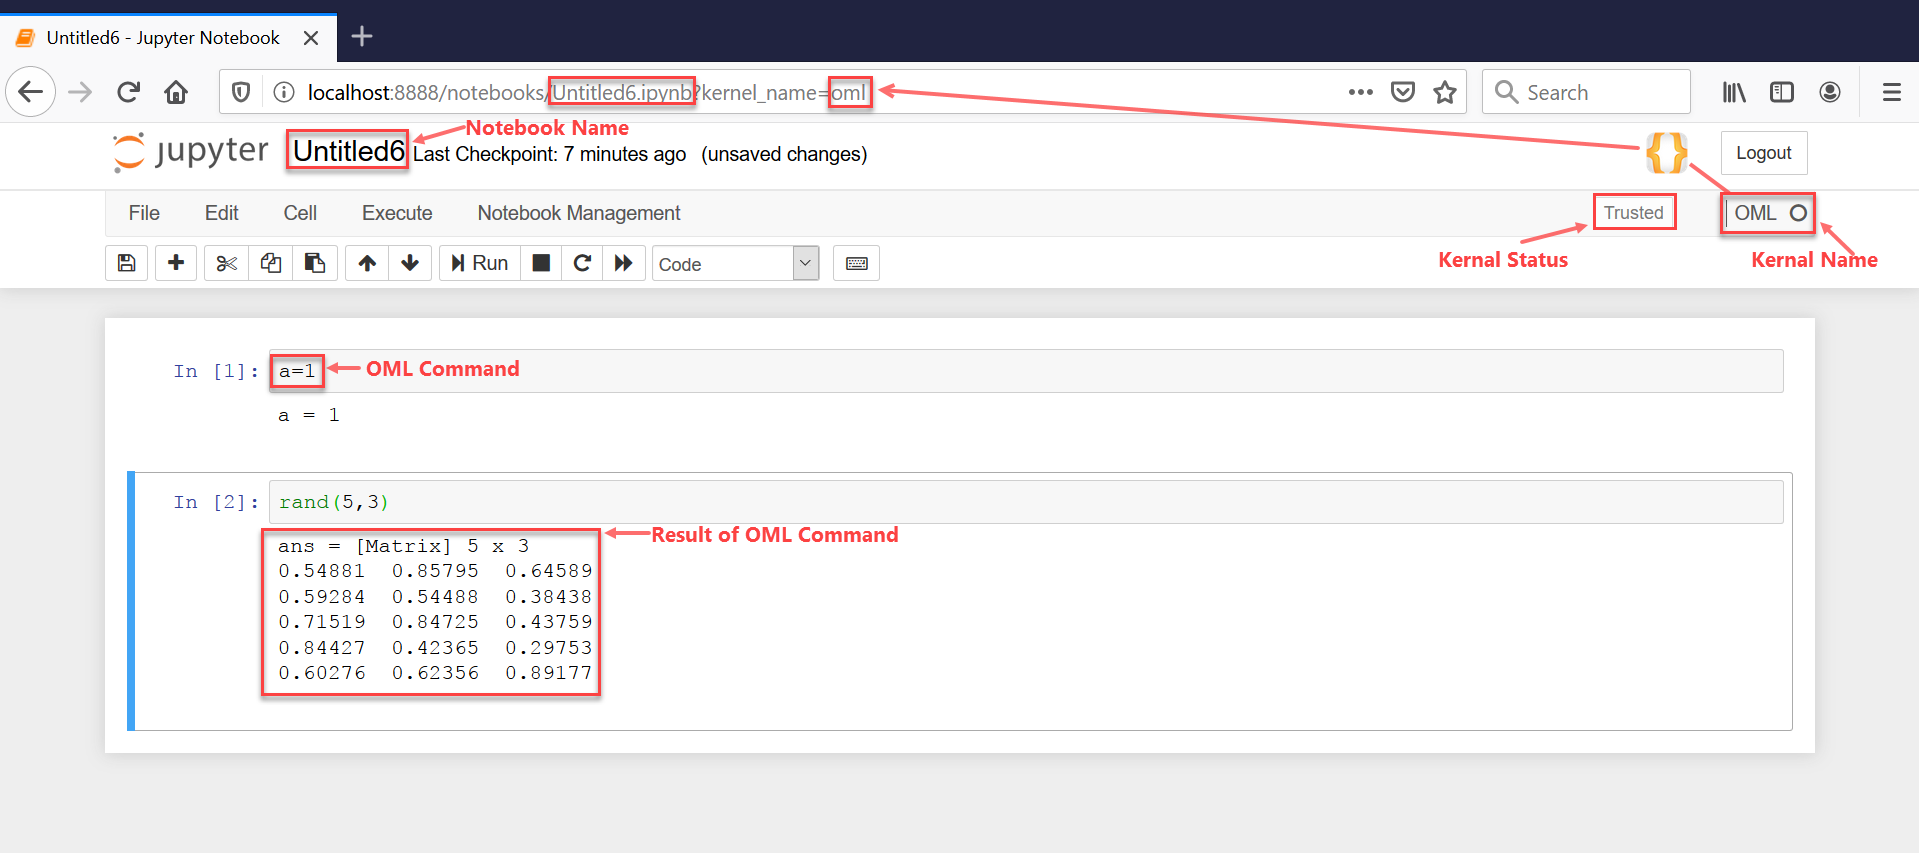
Figure 1.
Create and Execute a Compose Notebook
Like other notebooks, a Compose OML Notebook is based on creating and executing cells.
By default, an OML notebook cell is set to receive an OML statement.
- Press Ctrl+Enter to execute the cell.
- If you press Alt+Enter, the cell is not executed and a new cell is created below.
OML Notebook cells can also be used to enter other formatted content using the Markdown format. This allows for entering rich text (such as titles, bold face, and so on) and scientific text (using LateX).
The cell type can be changed from the Cells menu.
OML Commands in the Compose Notebook
- In a new Compose Notebook, when a plot command is executed for the first time, it may take some time to load the required underlying modules.
- Within the OML plot commands, the following commands are
not supported:
- dock
- drawnow
- ellipse
- imagesc
- imshow
- polar
- rectangle
- saveas
- uiwait
- undock
- Within the supported OML plot commands, the following
properties are not supported:
- Units
- Not supported in any of the commands.
- Figure
- position, visible
- Axes
- position
- Surface
- color
- Area
- basevalue
- Bar
- bargroup
- OML commands related to GUI creation are not supported in
this release. The only exception is the creation of sliders to act on
plots.Example
sliderHandle = uicontrol(f1,'style', 'slider', 'min', 2, 'max', 10, 'callback',@OnSliderValueChange);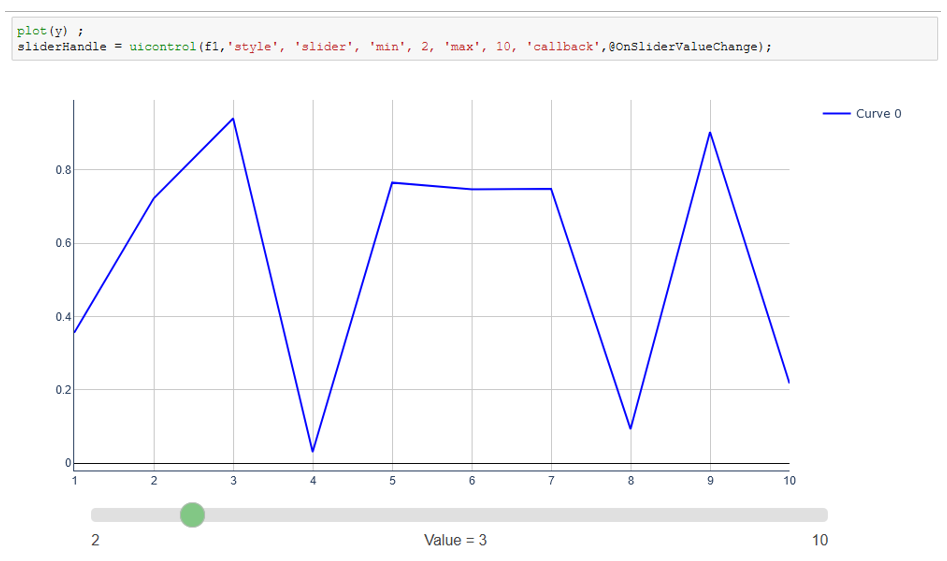
Figure 2. - To save the current state of the Notebook (including the plots) the Save button or action should be used. When a plot is saved, an external .html file is created in the ComposeNotebooks folder. To remove outdated plot .html files from the ComposeNotebooks folder, use the action .
- The CAE readers supported by OML are supported by the Compose Notebook (in the Business Edition), except for readvectorbuilder().