Find Welds Between Master and Adjacent Parts
Find welds on the edges between a single master part and a group of adjacent parts.
-
In the Connections workbench toolbar, click the
 (Create seam weld) icon.
- In the dialog, define the Section size (the length measured from the toe to the root of the weld).
-
Define the Minimum length.
Note: Any geometric edges found that are less than the minimum weld length will not receive a weld.
- Optional:
Activate the Intermittent weld checkbox to specify
intermittent welds.
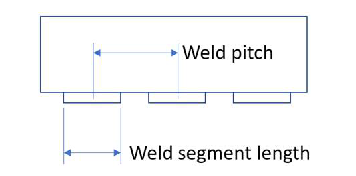
Note: Two parameters, weld pitch and weld segment length, are required for intermittent welds. the pitch must be greater than the segment length.Figure 1.

- Click the Master weld tab in the Create seam welds dialog.
-
Select master and mate part(s)
- Verify the Master part radio button is selected.
- Click on a part in the modeling window to select a master part.
- Activate the Mate part(s) of master part radio button.
- Click on parts in the modeling window to choose the mate part(s).
Note: It is possible to create a connection between multiple faces on a single part. To do so, select the same part in both the master and mate part fields. -
Click the Find welds button.
All welds found will be shown in the Welds found list. Each weld you select will be highlighted on the model.
- Optional: Use the Delete button to remove unwanted welds from the Welds found list.
- Click OK to create.